Open roasting project (1) [DIY]
Introduction

For a few weeks now, I have been very much involved with coffee. After having explored the different extraction methods, the idea came to learn about roasting. Thus, between the roasting, grinding and extraction, I would have in my hands a significant number of parameters for a better understanding of the role and contribution of all the elements of the chain that lead to a cup of coffee.
Roasting consists of bringing homogeneously green coffee beans to a defined temperature. We all have in mind the image of huge drumers brewing mountains of beans. Well, our project will be more modest in size, but not so much in scope. We will use a small POPCORN MACHINE that will roast 80 grams of green beans per batch. It’s not much, but it’s sufficient to last a day! (not even close, in my case…)
Popcorn machine
A popper is - out of the box - able to roast coffee. Put some green beans inside and press the button. One’s control over the process, however, is very limited. The only parameters one would have are the quantity of coffee and the roasting time. Also, these machines tends to heat the beans way to fast preventing the chemical development of valuable aromas (and resulting in a caracteristic sour taste).
This is where our project comes in. We need to control (and therefore measure) the temperature because the roast level is defined by specific temperatures. An Italian roast, for exemple, needs the beans to be brought to 245°C.
To do this properly, all the coffee beans must follow the same temperature curve to achieve a uniform roast level throughout the batch. To do so, we will favour a slow temperature curve and uninterrupted bean stirring produced by the popper fan.
Principle
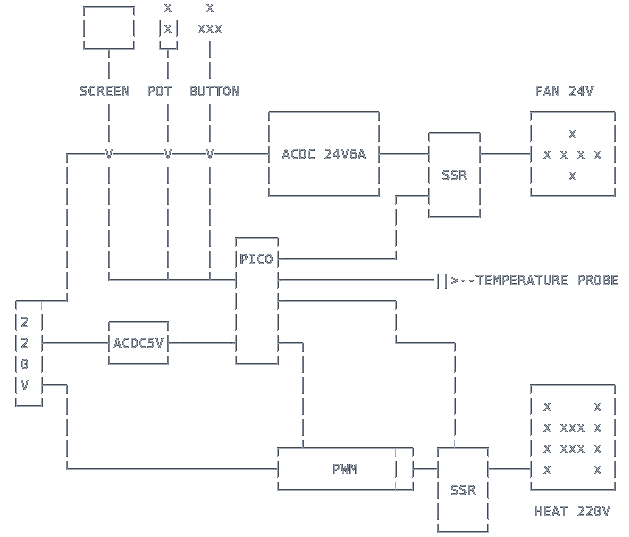
Well, we basically bypass all the electronic of the original device and connect directly the heating resistor to 220V and the fan to 24V. In between, we have the PICO, two SSR (relays) and one 220V PWM to modulate the heater. On the PICO, a python code will receive datas from the temperature probe and will command fan & heater accordingly.
Here’s a simplified schematic of the roaster.

Ingredients
1 | 1 Popcorn popper ($20) |
You may find better prices ordering directly from China (through aliexpress.com for exemple).
Note: The ACDC 220V–>24V needs to have at least 4 or 5 amperes to offer (mine is 6)
Why Raspberry PICO ?
First, it’s cheap and easy to use.
Then, I find it much more practicle than Arduino because the code isn’t compiled inside which means you may modify it directly whithin the device.
Last, Python is - imho - more readable than the Arduino C code. Minimalistic and elegant.
What we will learn
This article is not a tutorial but rather a guide to save you some time by avoiding the mistakes I made. It is also an introduction to using the Raspberry Pico, I/O management and micro-Python.
Finally, and perhaps most importantly, we will have an almost complete control of our coffee, which justifies all the effort to come!
In the second part of this article, we’ll get to the heart of the matter and put our hands to work. In the meantime, you can fill your basket, order what you need and wait patiently for delivery.